Showing posts with label Style. Show all posts

STYLE FILE: JAXONPAIGE DESIGNS

Today I’m excited to feature JaxonPaige Designs. Designer Yesica is creating some FAB custom printed products! I reached out to Yesica this Summer with an idea for a custom tee. My girls are in LOVE with Disney’s Descendants; after seeing the movie, I wanted to get Vivian a “Fairest” tee with a big ol’ glitter crown on the back (just like the one Evie wears in the movie) then upcycle it into a comfy dress; Yesica enthusiastically accepted my custom order and created a tee that was exactly what I had envisioned!
Here’s a peek at our final product:

Daydream Believers for Jaxon Paige Descendants DressDaydream Believers for Jaxon Paige Descendants Evie tee upcycleDaydream Believers for Jaxon Paige Descendants tee upcycle 2

Yesica had the great idea to create a “Mal” inspired tee for the girls too.
I LOVE her use of glitter! My girls flipped when they saw the logo replicated so beautifully!
Since my girls live in knit dresses; I upcycled this tee into a dress too.

Daydream Believers for CKC Tessa Knit DressDescendants tee by Jaxon Paige sewn by Daydream Believers

SO great! THANK YOU Yesica for the great tees, they are exactly what I had envisioned!
I'm already looking forward to what we can create together next!

Daydream Believers for Jaxon Paige Descendants tee upcycle

 
:: BONUS ::
Do you want a custom Descendants tee for your girl? You’re in luck!
Yesica is generously offering new customers 10% off the purchase of these tees!
Daydream Believers readers, head over to JaxonPaige Designs and mention this post to begin your custom order. Go shop and support small shops!

Style File Friday–The Eloise Swing Skirt

This shop makes the CUTEST clothing for girls. Check out Daydream Believers Designs. This Eloise skirt is perfection! #kidstyle #etsy #handmade  #daydreambelieversdesigns

Today’s style file feature is all about my favorite new skirt, Eloise!

“Eloise” is a playful, 50's inspired swing skirt with a flat front, curved waistband. This timeless style can be worn year round. I love the way my client Emma (and her mom) styled this look with a fun tee and big ol’ bow. Emma’s outfit is perfect for Valentines Day and long after! Thanks for the wonderful photos, Jes!
This shop makes the CUTEST clothing for girls. Check out Daydream Believers Designs. This Eloise skirt is perfection! #kidstyle #etsy #handmade  #daydreambelieversdesignsThis shop makes the CUTEST clothing for girls. Check out Daydream Believers Designs. This Eloise skirt is perfection! #kidstyle #etsy #handmade  #daydreambelieversdesignsThis shop makes the CUTEST clothing for girls. Check out Daydream Believers Designs. This Eloise skirt is perfection! #kidstyle #etsy #handmade  #daydreambelieversdesigns

:: SOURCES ::
The Eloise Skirt by Daydream Believers //tee by Sail East Couture //photos by Captured by Jes

One more sweet photo from Captured By Jes. Thank you for sharing, Jes!This shop makes the CUTEST clothing for girls. Check out Daydream Believers Designs. This Eloise skirt is perfection! #kidstyle #etsy #handmade  #daydreambelieversdesigns

You can grab an Eloise skirt of your very own HERE in the Etsy Shop.

Style File: Custom Brenna Bow Dress

Modern handmade dresses for girls. Vintage Inspired, Classic Style. Daydream Believers Designs.

Featuring a fun pleat, wide straps and a sweet (removable!) fabric bow; “Brenna” is a fresh twist on the classic A-line dress. This version of Brenna was a custom order, made especially for Emma in this modern geometric print. I love how she (and her mom) styled the look with great yellow shoes and a simple yellow ribbon in her hair. Classic meets modern. Thanks for the wonderful photos, Jes!

Modern handmade dresses for girls. Vintage Inspired, Classic Style. Daydream Believers Designs.Modern handmade dresses for girls. Vintage Inspired, Classic Style. Daydream Believers Designs.Modern handmade dresses for girls. Vintage Inspired, Classic Style. Daydream Believers Designs.Modern handmade dresses for girls. Vintage Inspired, Classic Style. Daydream Believers Designs.Modern handmade dresses for girls. Vintage Inspired, Classic Style. Daydream Believers Designs.


Sources: “Brenna” Dress by Daydream Believers Designs // Photos by Captured By Jes

America The Beautiful

America! America! God Shed His Grace on Thee!
(America The Beautiful)

We had a beautiful weekend celebrating Independence Day! We kicked off the festivities by taking the kids to their first ever Fourth of July Parade; such a great way to start the weekend! It was HOT and Sunny, so after the parade we headed home and spent the next 48 hours swimming, reading, and eating; it was perfect! The kind of weekend you just unplug from work, put down the phones and just chill. Here are just a few photos from before/at the Parade
Fourth of July 2014 Parade Pictures _ What to wear to the Fourth of July Parade

The girls wore coordinating outfits that I made them and looked SO cute! We had a mini-crisis when we woke up Friday morning and Iyla was suddenly a good inch too tall to wear her outfit (she is growing SO quickly!) – Thankfully, little sister is just a size behind her, so we pulled a quick switch and Viv wore Iyla’s outfit, Iyla wore Viv’s outfit and all was good. (Ok, tears were involved and we had to allow Vivi to wear a stack full of bracelets and eat a cookie for breakfast; but by the time we left for the parade, it really was all good!)

If you’re here for the fashion, here’s our “What We Wore – Fourth of July Parade Edition”
What to wear to the Fourth of July Parade Kids Style


Tell Me – Who wore “Daydream Believers” this weekend? Post a picture on Facebook or tag me on Instagram
xx M.

CUSTOM RAPUNZEL BIRTHDAY DRESS

Everyone has a dream.
– Rapunzel, Tangled

I know I say it all the time, but seriously y’all – I LOVE Custom Orders!
How fun is this Tangled-inspired outfit that I designed for Miss Emaleigh’s third birthday?

Ema’s Party Dress features a very full (very twirly!) double skirt. The top layer features seven gorgeous designer fabrics in shades of pink and purple. The bottom layer is solid maize, a nod to Rapunzel’s golden mane. The skirt is embellished with handcrafted ruffles and a hand cut applique 3 (in Pascal green!) The sweet yellow straps feature flutter details at the shoulder and criss cross in the back to form a bow.

This gorgeous dress is paired with ruffle shorties in lavender (for a little modesty while the birthday girl is twirling around in her fabulous dress) and a handcrafted flower headband with three blooms and a little bling.

Emaleighs Custom Rapunzel Tangled Inspired Birthday Outfit by Daydream Believers
Blythe style party dress, ruffle shorties, and three bloom headband :: all handcrafted by Daydream Believers.

Thanks for choosing Daydream Believers Designs, Becky! Happy Birthday to Emaleigh!

SHOW AND TELL

How was your weekend? Mine was wonderful! Laid back with LOTS of sewing time.
Here’s a peek at what I’ve been creating…

: Modern Baby Blanket : Baby blankets are among my *favorite* gifts to give. Blankets are a great project for showcasing beautiful fabric. I love creating these beautiful blankets using modern, unexpected fabrics. This sweet blanket is a gift for a brand new baby girl.

*Mark your calendars, starting March 24th I’m sharing a great collection of tutorials for creating handmade baby gifts!


: Addison Tops : These sweet tops shipped out on Saturday. GO Tigers!


: Doggy Bandanas and Leash : This weekend we celebrated the 8 year anniversary of the day we adopted our wonderful dog, Roxy. We gave her a few gifts to commemorate the day; I made her a new leash and a reversible bandana. Roxy is such a good  girl!  Here she is wearing her new bandana! SO sweet!


I also made a bandana for my sister’s brand new (SUPER ADORABLE) Goldendoodle puppy, Maggie -

Tomorrow I’m sharing the details on how to create a handmade leash and bandana for your fav pup!

MAKE THIS LOOK– A DIY GUIDE

I love this boys-wear-for-girls look from J.Crew; but I don’t love the $268+ price tag.
Here’s my DIY guide to making your girl this sweet look for WAY less!
Daydream Believers is showing you how to Recreate this fabulous ($300!) J.Crew outfit, at home, using 3 inexpensive sewing patterns. #kidsfashion #handmade

To make this look at home, you’ll want to start by heading over to Peekaboo Pattern Shop and grabbing these three patterns: The Little Gentleman’s Suit Jacket, Skinny Jeans, and the Liesel Top.
(Use code “save10” and save 10% when you purchase all three)

Then choose your fabrics and you’re ready to sew! To recreate the J.Crew look, try these fabric selections from Fabric.com: Stretch Pacific Denim in White for the jeans. Blue grey oxford cloth for the jacket. 
Premier Prints Amsterdam and Desoto Black and White Stripe for the blouse. 
I think the white denim pants would look great paired with a coral jacket and soft grey blouse, too!

---------------------

I’d  love to wear this look myself! How about you?
Tell me: What do you think of this boys-wear-for-girls look? What do you think of $300 outfits for kids?
Share your thoughts in the comments.


(Quick Note)
This post is not endorsed by or affiliated with J.Crew, The Peekaboo Pattern Shop, or Fabric.com.
The original J.Crew look can be purchased, here

STYLE FILE FRIDAY :: Christmas Preview For The BOYS

Oh! Hi there interchangeable neckties with fully adjustable neckband (to grow with little guys) -
photo (7)
You sure are rad! ;)

These lovelies (and more!) will be available for purchase on Monday morning!
Be sure to stop by the blog SUNDAY night for a FULL, detailed, preview of ALL the great items
I will be uploading to the shop on Monday!
Have a great weekend! xx

STYLE FILE FRIDAY :: Halloween Edition

Hello Lovelies! I hope you and your little ghouls had a blast yesterday!
Our Halloween was SO much fun! It was WINDY and RAINY – but we didn’t let the weather slow us down!
My little loves hunted with the best of ‘em and we have the Halloween Hangovers to prove it!
*Halloween Hangover = the feeling of exhaustion that follows a night of costume wearing and candy eating.
 
Thankfully, I was able to dress the girls in their costumes and take some photos of them earlier in the month, when the weather was still lovely; so I have a few shots to share of my DIY Tooth Fairy and Unicorn costumes.

First Up, The Tooth Fairy
diy tooth fairy costume handmade halloween by daydream believers designs
Iyla is wearing a Prima-Ballerina style tutu from Daydream Believers Designs that I embellished with strands of glittery ribbon, tiny glitter “teeth” made from sheets of glitter foam, and a large, iridescent “tooth”. The Prima Ballerina Tutu is ultra full, and completely lined; making it PERFECT for layering on Halloween! I paired the tutu with a glammed-up Audrey Top in white knit with LOADS of pink chiffon ruffles, and accessories from Wishcraft.

Vivian’s unicorn was created, in detail, from the sketch that she designed for this costume.
It was a BLAST to bring her vision to life!
diy unicorn costume handmade halloween from daydream believers designs
Her warm & comfy romper was an original dbd design – featured wide legs and full length sleeves. This romper may be my new go-to-base for costumes! Bunny? Dog? Cat? Monster? Next year, I’ve got ya covered! ;) Per her instructions, V’s suit was embellished with big ruffles and glitter trim. Because unicorns totally have fancy glittery hooves, right? ;) Her looong pink mane was handsewn down her back and looked awesome when she galloped around. Both the mane and unicorn horn were purchased from Wishcraft and jazzed up a bit with glitter spray.

The best choice of costume this year has to go to my mom though; she chose “It’s raining cats and dogs” and it was a perfect choice for a rainy Halloween! If you ever need a quick diy costume – this one is ADORABLE!
quick diy halloween costume how to make its raining cats and dogs costume last minute handmade halloween by daydream believers designs

It was a fun night! Here’s a snapshot of my crew
Halloween Family 2013
Our Family, 2013: The Unicorn, Scarecrow, Cuddle Monster, Tooth Fairy and Bandit.

Did you dress up? What did your littles wear? Leave a comment telling me about your Halloween and I will draw a name from the comments on Sunday and someone will win a $5 gift card to the DBD Shop! xx

Style File


Tutorial: How to make an easy knit headwrap–for FREE


My little queen bees are BUSY girls! They spend their days in constant motion: playing, swimming, dancing…
Our go-to hair accessory for comfortably maintaining neat hair, while still looking stylish, is a wrap headband.
My Iyla Rue has been rockin’ the head wraps since before she could walk! They are her absolute FAV!

Wear one with a top knot, with a pony, or with hair au’ natural; no matter how you style it –
you and your little lady will love the look of these wraps!
Want to know a secret? These wraps are EASY to make! Seriously, EASY!
*AND* You can make one for FREE… or very close to it!  Here’s the scoop:

how to make a knit headwrap head band free tutorial from daydream believers

Tutorial: Make a Ruffle Swimsuit Cover

make your own ruffle swimsuit cover diy free dress pattern for girls
I hope y’all are having a GREAT summer! My fam and I are having a wonderfully laid-back summer!
Lots of lazy days in the backyard, eating ice cream for lunch and soaking up the sunshine in our pool.
Most days, my girls are in their swimsuits from sun-up to sun-down; just the way summer should be! ;)

In the spirit of deliciously-laid-back summers, I’ve created this tutorial for making an easy, breezy, swimsuit cover!
ruffle swimsuit beach cover tutorial diy free dress pattern 2

Style File: What Queen Bees Wear to a Patriotic Pool Party


patriotic style guide for girls nautical pool party what to wear
Ruffle Swimsuit Cover by Daydream Believers (( FREE DIY Tutorial here on the blog tomorrow! ))
Red Sparkle Headband from Joann Fabrics  ::  Star Covered Sunnies from Target
Nautical Tankini from Zulily  ::  Red Leather Saltwater Sandals from Nordstroms
Style File

Handmade Fourth of July

I hope everyone had a great day yesterday; we sure did!
My little ladies proudly rocked their handmade-by-mumma red, white & blues in celebration of Independence Day!
Daydream Believers all started from my desire to create for my girls; here’s a look at what they wore this 4th of July:


Tutorial: Learn to make the EASIEST Earrings Ever!

Welcome to the final day of the Handcrafted Easter Event here at Daydream Believers! :)
Easter is just days away, but don’t fret my friends, there is still time to create some very sweet jewelry that your little queen bee is sure to love! These dainty flower bud earrings will make a sweet addition to any girls Easter Basket! They are SO easy to make, I almost didn’t even write this tutorial; but, just incase you were wondering how to make those super popular cabochon earrings that are all over the stores – here’s the scoop!


Tutorial: Felt Flower Pin

Welcome back to the Handcrafted Easter Event here at Daydream Believers! :)

You are going to LOVE today’s tutorial! I’m going to teach you my favorite way to make a fun, felt flower pin. I know there are a lot of ways to make felt flowers; this one is my favorite! The flowers are easy to assemble and made with supplies you probably have on hand in your craft-stash. You can finish the flowers off in back with a silver bar pin, an alligator clip, or my fav a combination bar pin/clip; so you and your little loves can wear these flowers pinned to a shirt, jacket, dress, scarf, clipped to a purse, headband, necklace, or right into your hair! Gotta’ love that!


You can easily customize these flowers (making them more dressy or more funky) depending on the color combination you select.

Tutorial: Felt Pinwheel Hair Clip

Welcome back to the Handcrafted Easter Event here at Daydream Believers! :)
If you are just joining in, click here to learn to make chunky beaded necklaces, and here for the ribbon wand tutorial!
**

When putting together a gift for a little girl, hair accessories are always a GREAT choice! A girl can never have too many! These sweet pinwheels are perfect for Spring! They are so darling; I think you’ll be surprised just how EASY they are to make! {Seriously, 5 simple steps, that’s all!} Did I mention they cost less than $1 to make?


Here we go…

Tutorial: DIY Chunky Bead Necklace for Girls


Last fall, before the BEE Merry & Bright photo shoot, I made the girls some chunky bead necklaces to wear -
They were SO cute! I just love the whimsical look of the chunky beads; perfect for my silly little fashionistas!
My girls have quite a few of these fun necklaces in their jewelry boxes and just love them!

Want to make one to add to your little queen bee’s Easter Basket?
Here’s the scoop…

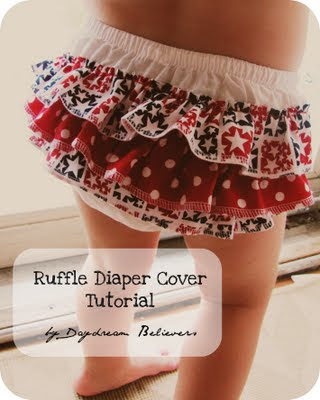
Tutorial: Make a Ruffle Bloomer * Diaper Cover

Miss V* will be rockin’ a new red, white and blue tutu this weekend and she was in need of a matching pair of bloomers.  Thankfully I had  a plain white cover on hand. I added some festive fabric scraps was able to make her an adorable ruffle bloomer in less than 30 minutes! 


FREE DIY TUTORIAL How to make a boutique ruffle bloomer (diaper cover)


Cute, right? This was such an easy (and adorable!)  project that I wanted to share the DIY details with you so you can make one too!

You will need:
One Plain Diaper Cover
Three Strips of Fabric (Cut 2 inches wide x 20 inches long)
Sewing Supplies

Here's the scoop:
How to make a ruffle bloomer ruffle diaper cover. A Free tutorial from Daydream Believers


Finish the edges of each fabric strip.

{Note: For the cover shown here, I finished the edges of each long side using my serger. Alternatively you could finish the edges with a tight zigzag stitch or you could hem each piece with a narrow hem. If hemming, you may wish to increase the width of your strips from 2 inches to 3 inches.}

Ruffle ‘em up! ;) 
Sew a gathering stitch along the top edge of each strip. Gather each strip of fabric until it is the same width as the back of your cover. {{Please check out this tutorial for three easy ways to create ruffles}

Put it all together...Place and pin your first strip of ruffles across the back of your cover. Be sure to tuck your ends under at the beginning and end of the strip. We are working from the bottom up, so look at the leg opening of your cover, and place your first strip just above this point. Using a straight stitch, sew your ruffle strip onto the cover. Then, position your second strip of ruffles so that the bottom edge of the ruffle sits around the middle of the row beneath it. Pin and sew the strip on to the cover using a straight stitch. Repeat with the third and final strip.


That it friends!  Easy peasy and oh so adorable!

How to make a ruffle bloomer ruffle diaper cover. A Free tutorial from Daydream Believers


Tutorial, Make a toddler apron from a tea towel!

Happy February, friends! It is the month for L-O-V-E! :)
Today's post combines three things I love -
  • Sewing for my girlies
  • Great deals from Target
  • Teaching
**
Today, I'm going to teach you my easy-peasy way to
whip up this sweet little apron in 20 minutes or less.
Seriously! It's that easy! :)
Pretty cute, eh?

A few weeks ago, I bought this set of adorable tea towels
from Target dollar spot for just $2.50.
The prints were so cute (and check out the trims!) - I knew
I could use them to make something sweet for my girls.
Miss I* and Baby V* love to help mumma in the kitchen,
so I decided to make them each a new apron.
Here's the scoop -

{Supplies}
1 tea towel (pre-washed and ironed)
1 piece of ribbon (A) cut to be 2 times your little's waist + 6 inches
1 piece of ribbon (B) cut to the desired width of your apron

Note: You can use any width ribbon and may want to use
matching ribbon for both pieces. I was scrap-busting for this project,
so my ribbon is mismatched. :)

{Step 1} Cut your apron.
Cut your towel to your desired length by cutting along one side.
Congrats, you're done with all the cutting for this project! :)
{I told you, this is easy-peasy!}
V* wears a size 24 month. I made her apron 9 inches long.

{Optional Step} Adjust the width of your apron.
If your apron width works as is, just skip this step! :)
I wanted the waist of Baby V*s apron to be 10 inches wide;
my fabric was 14 inches wide, so I adjusted the width by sewing
a gathering stitch along the unfinished edge of the apron and
gently gathering the fabric until it was 10 inches long.
Another option would be to add pleats!

{Step 2:} Finish your edge.
Since the sides and bottom of your apron are already finished,
we just need to finish the top, whoo hoo! :) Sew a very tight
zig zag stitch (or serge w/a serger) along the unfinished edge,  
then take ribbon piece B and baste it onto the wrong side of
your fabric. Basting is sewing with a straight stitch set to a wide width.
The "back" of your apron - You're almost finished!

{Step 3} Add your sash.
Center you ribbon piece A across the right side, top of
your apron and pin in place. Sew along each edge and
all the way around ribbon piece A; fully attaching it to
your apron.
That's it!

One super cute, boutique style apron,
handmade in under 20 minutes,
for less than $5!
LOVE that!
I added a little more flair to V*s apron by sewing on this sweet pink bow!


--
If you have any questions about this tutorial, please ask me;
I'm happy to help you make an apron for your little sweetie!
I'm sharing this tutorial at THESE fab linky parties!
*This tutorial is for personal use only. Thanks!
Proudly designed by Mlekoshi playground